Saturday, December 11, 2010

OGourmet Product - Saffron Pea Risotto


OGourmet, an online food store located in Montreal, recently contacted me to review one of their products. At first, I was hesitant whether I should do it or not as I have never done this before. Somehow I felt that I should be accepting this offer, maybe because some of my local food bloggers have already reviewed a product from OGourmet, so I might as well give it a shot. Check out their OGourmet products reviews on The Chocolate Bunny and Cheap Ethnic Eatz.

OGourmet offers a wide selection of local and imported gourmet products and detailed information on how to use them. You can find, on their website, products that might not be easily found in your local grocery store such as wild mushrooms, truffles, rice, berries, pâtés, etc... They didn't give me a specific product to review so I sort of have the freedom to choose which product to review.  Since we only have a small pantry of spices at home, I looked carefully all the products in the Condiments & Spices sections.  One product that attracted me is the saffron stigmas, imported from Italy.  As it is the most expensive spice in the world, I never had a chance of owning some myself.  I received the product the following day that I requested it. That's some quick delivery!


The saffron is contained in a little sealed glass bottle. After I opened the bottle, I notice a strong unique flower-y aroma, clearly these stems are the real stuff.  I was brainstorming what I should be doing with 1 gram of saffron and the possibilities are endless. The first two things that come into mind are paella and bouillabaisse, since my Taiwanese friend already made both of them in the past, I won't be posting an alternative version.  I looked inside my pantry for ideas and realized that I have some Arborio rice, white wine, vegetable stock, frozen pea and Parmesan. Why not a saffron risotto? The basics of risotto are easy and simple to make, so check out all four versions of risotto made in the past using the "My Recipe Search" on the right column.

Stay tuned for my next recipe... it will be a saffron-based dessert.

Serves 4
Preparation Time: 15 mins
Cooking Time: 40 mins
Printable Recipe

Ingredients

2 cloves of garlic, minced
1 medium onion, chopped
1 1/2 cup Arborio rice
1/3 cup white wine
1 pinch saffron stigmas
5-6 cups vegetable stock
1/2 cup green peas
1/3 cup freshly grated Parmesan
Salt and pepper
Fresh parsley leaves for garnish

Procedure

1. In a large skillet, heat oil and melt butter over medium-high heat. Cook onion until transparent and mushrooms until soft, about 5 mins. Remove from skillet.

2. Add rice to skillet. Leave for 3-4 mins until almost translucent. Add garlic and cook until fragrant, about 1 min.

3. Add white wine, saffron, and a ladle of vegetable stock. Let rice adsorbed most of the liquid before adding more liquid, stir constantly. Continue in this manner until it gives a creamy consistency. After 4-5 ladles, add green peas and onion.

4. Once done, stir in Parmesan cheese and season with salt and pepper. For a creamy texture, add butter.


5. Spoon risotto onto serving bowls. Garnish with parsley and sprinkle with Parmesan cheese.

Wednesday, December 8, 2010

Oven Baked Sweet Potato Fries with Homemade Ketchup


Do you know any dishes in which nutmeg is the main ingredient? I have to admit that I don't know the answer to this question. As I understood, an excessive consumption of nutmeg can lead to hallucinations, nausea and other unwanted symptoms that you don't want to know about unless your skepticism leads you to google it. Don't worry a few tablespoons of nutmeg won't harm you!

At some point, in the life of an amateur cook, you feel that it is necessary to make your own version of products that are largely available in stores and see how it turns out. In the past, I tried several version of homemade ketchup (or catsup) that are available online. The taste was decent but none of these approach to the taste of Heinz ketchup. One day, I bumped into Michael Smith's Chef at Home show where he made homemade ketchup, I was shocked to hear that nutmeg is a key flavor to ketchup and he did put a few tbsp of nutmeg into his ketchup. I said to myself that this statement can't be right since most of the time, a pinch of nutmeg enough to enhance flavors to our dishes. I read some food blogs who also had some doubts about the quantity of nutmeg used and ended up using a pinch of nutmeg in their ketchup. At the end, they were more or less satisfy of their end results.

Michael Smith's recipes have not failed me yet so I decided to take a leap and follow exactly his recipe. He was right, nutmeg is essential for ketchup and taste really close to the store-bought one. I still have a full jar of homemade ketchup lying inside my fridge. My only change to his recipe is to reduce the amount of red wine vinegar to 1/2 cup.

The best way to taste your homemade ketchup is to serve with healthy and tasty oven baked sweet potato fries with a hint of cumin and paprika.

Serves 6
Preparation Time: 20 mins
Cooking Time: 45 mins
Printable Recipe

Ingredients

Homemade Ketchup

1 (28oz.) can crushed tomatoes
1 small can of tomato paste
1 medium onion, chopped
1/2 cup red wine vinegar
1/2 cup sugar
1/2 cup olive oil
about 2 tbsp nutmeg
1/4 tsp ground allspice
3-4 bay leaves
Salt and pepper

Sweet Potato Fries

2-3 large sweet potatoes, peeled and cut into small strips
1 tsp cumin
1 tsp paprika
Salt and Pepper
Olive oil to coat

Procedure

1. Combine all ingredients into a large saucepan.

2. Place over medium heat and bring to simmer. Stirring occasionally, until mixture reduces to half, about 45 mins. Remove bay leaves. If necessary, use an immersion blender to make the ketchup even smoother.


3. Preheat oven to 425F.

4. Meanwhile, prepare sweet potato fries. In a large bowl, combine sweet potatoes strips with spices. Drizzle with olive oil to coat.


5. Align aluminium foil onto a baking sheet. Arrange potatoes in a single layer.


6. Bake for 30-40 mins until soft and golden. Turn over fries halfway. Serve with homemade ketchup.

Sunday, December 5, 2010

Creamy Pumpkin and Bay Scallop Soup


What is your favorite soup for the cold times? My last attempt on a creamy texture soup without the use of cream was such a success that I wanted to do it with other vegetables. As a routine and also to keep this blog up-to-date, I love to do most of my experiments at my Taiwanese friend's place on Sundays. These are the days where I combine ingredients that most of us don't think of.

This soup was made over a month around Halloween where we had an abundance of pumpkin lying around inside the fridge. We also added bay scallops to give a seafood taste to the soup. We followed a similar procedure as the Broccoli Soup using potatoes as our thickener and purée all the ingredients using a immersion blender.  

Serves 6
Preparation Time: 15 mins
Cooking Time: 35 mins
Printable Recipe

Ingredients

1 lb pumpkin, peeled, seeded and cubed
1 medium onion, chopped
1 large red potatoes, peeled and diced
2 garlic cloves, minced
2 1/2 cups vegetable stock
1/2 lb bay scallops
salt and pepper to taste

Procedure

1. In a large pot, heat oil over medium-high heat. Cook pumpkin, onion, and potatoes for 5 mins until onions are transparent. Add in garlic and cook for 1 min until fragrant.

2. Pour in vegetable stock, bring to a boil and simmer until pumpkin and potatoes are soft, about 15 mins.

3. Purée mixture in a blender until smooth. Transfer back to pot, add bay scallops and simmer for 10 mins until scallops are cooked. Season with salt and pepper to taste.

Thursday, December 2, 2010

My 200th post - The Chinese Feast


Olé! Olé! This is the official 200th post on Random Cuisine. I'm currently writing this post in the bus as I'm heading to Ottawa to visit my PhD superviseur. This is the start of a whole new chapter of my scientific career and an opportunity to explore new branches in nanotechonology, the field of research which I really enjoy doing research on.


In October, I was really pumped to start my new research and I had planned my farewell party three weeks before the departure date. A few days before the farewell party, I received an e-mail from the institute that I can't work due to "security issues" and these issues should be cleared by the month of February. I felt heart broken, but at least my life as a graduate student is not ruined. I can still pursue research at McGill with my Master's superviseur while the institute resolved these bureaucratic issues. Well, the new graduate students of my "old" research group are glad that I can share my scientific know-how. My friends are also glad that I continue organizing weekly cooking sessions which  have been running for over 2 years now. As I can't officially start working in Ottawa, occasional visit like the one right now and e-mail exchange with my PhD superviseur are the only possible solutions. Life is full of ups and downs. We have to live by our choices and let the dice rolls.

Despite these unfortunate circumstances, I didn't want to cancel the "farewell" party after weeks of planning the menu and food preparations. Here is the final version of the menu:

Soup

Ginseng Soup

Appetizers

Vietnamese Rolls
Pork Dumplings

Vegetarian

Mixed Chinese Vegetables
Singapore Noodles
Choy Sum (Chinese Leafy Greens)

Meat

Sweet Glutinous Rice
Curried Pork Chops
Sauteed Beef with Sugar Snaps
Shrimp in Rice Wine Sauce
Stuffed Eggplants in Oyster Sauce
Roasted Turkey

Desserts

Hong Kong Egg Tarts

The menu is a tour of some traditional dishes usually found in real Chinese restaurants. These dishes would not be realized without the help of my brother and my parents. I can guarantee you this Chinese feast can feed up to 50 guests. At the end of the night, everyone was really full and ended up bringing 2-3 large tupperwares of leftovers home.

Warning: the following images can make you drool. I simplify some of the recipes to 4-6 servings, the images might or might not be representative. I don't have all the recipes in hand, they will be updated in the future. Sorry for the incovenience...

Ginseng Soup

A traditional Chinese herbal soup which consists of ginseng cooked in homemade chicken stock. The soup tastes a little bit bitter and provide health benefits (according to my parents).


Vietnamese Rolls

A refreshing appetizer which consists of rice noodles, thinly sliced vegetables, and Chinese mushrooms (wood ear, shiitake, cloud ear) which are then wrapped in rice paper. These rolls can be dipped in either soy sauce or plum sauce. You can find this recipe in one of my past post found here.


Pork Dumplings


This appetizer is suitable for dim sum lovers, my mom loves to make it for breakfast when ground pork is on special. This filling is customizable, you can find alternative ones such as Assorted Mushroom Dumplings and Steamed Gyoza. Here is our family version of the filling:

Serves 6
Preparation Time: 1hour
Cooking Time: 10 mins per dumpling

Ingredients

1lb ground pork
3-4 shrimp, deveined and deshelled
4 oz. nappa, finely diced
3 shiitake mushrooms, finely diced (optional)
1-2 tbsp Chinese chives, finely diced
1/2 tsp soy sauce
1/2 tsp salt
1/4 tsp pepper
Pinch of sugar

Procedure

1. In a large bowl, combine well filling ingredients. Cover and place in fridge for 30 mins.


2. Place a teaspoonful of filling in center of each wrapper. Moisten edges of wrapper with water. Fold in half to enclose filling and pinch edges to seal.


3. In a large skillet, heat oil over medium heat. Arrange dumplings in pan, avoid overlapping. Cook for 2 mins until light golden.

4. Add about 1 cup water to pan, cover and cook for 5 mins. Uncover and let liquid evaporates, about 1 min. Serve hot.

Mixed Chinese Vegetables

This will sure satisfy your vegetarian guests. This dish contains broccolis, carrots, fried tofus, lotus roots and, shiitake mushrooms cooked in a light soy sauce.


Singapore Noodles

Curried vermicelli noodles consist of a blend of vegetables. Meat such as chicken, pork and shrimp can be added to the dish. This recipe will be added soon...


Choy Sum (Chinese Leafy Greens)


A classic Chinese vegetable mainly found in Chinese market. You only need to cook these vegetables in boiling water with 2 crushed garlic cloves. It is fully cooked once it changes from light to dark green. These are usually served with a drizzle of oyster sauce and light soy sauce.


Sweet Glutinous Rice


This rice requires an overnight soaking before employing it. Once ready, the rice is then cooked in a rice cooker. Chinese sausages, dried prawns, shiitake mushrooms and soy sauce are then mixed with the rice to provide a sweet and salty taste.


Curried Pork Chops

This dish is a family favorite, all you need is to marinade the pork chops in curry and it is ready to use for your next meal. The recipe can be found here.


Sauteed Beef with Sugar Snaps


I love my mother's marinated beef. If you need to make a quick dinner, this is it and complement it with rice and vegetables.

Serves 4
Preparation Time: 10 mins
Marinade Time: 30 mins
Cooking Time: 10 mins
Printable Recipe

Ingredients

1/2 lb beef tenderloin, thinly sliced

Marinade
1 tbsp light soy sauce
1 tsp cornstarch
1 tsp rice wine
2 tsp ginger, cut into matchsticks size

1 garlic clove, minced
200g sugar snaps or snow peas, ends removed
1/2 cup beef stock
2 tsp oyster sauce
1/2 tsp cornstarch + 1 tbsp water

Procedure

1. In a bowl, combine marinade with beef. Cover and let it marinate for 30 mins.

2. In a wok, heat oil over medium-high heat. Add garlic and cook until fragrant. Add beef and sauteed for about 2 mins. Set aside.

3. Add in sugar snaps, sauteed for few seconds. Add oyster sauce and beef stock. Cover and cook for 2 mins.

4. Meanwhile, make slurry by mixing cornstarch and water.

5. Return beef to wok. Add in slurry to thicken. Mix well and serve.

Shrimp in Rice Wine Sauce

A classic Chinese dish which consists of shrimp cooked in a rice wine sauce.

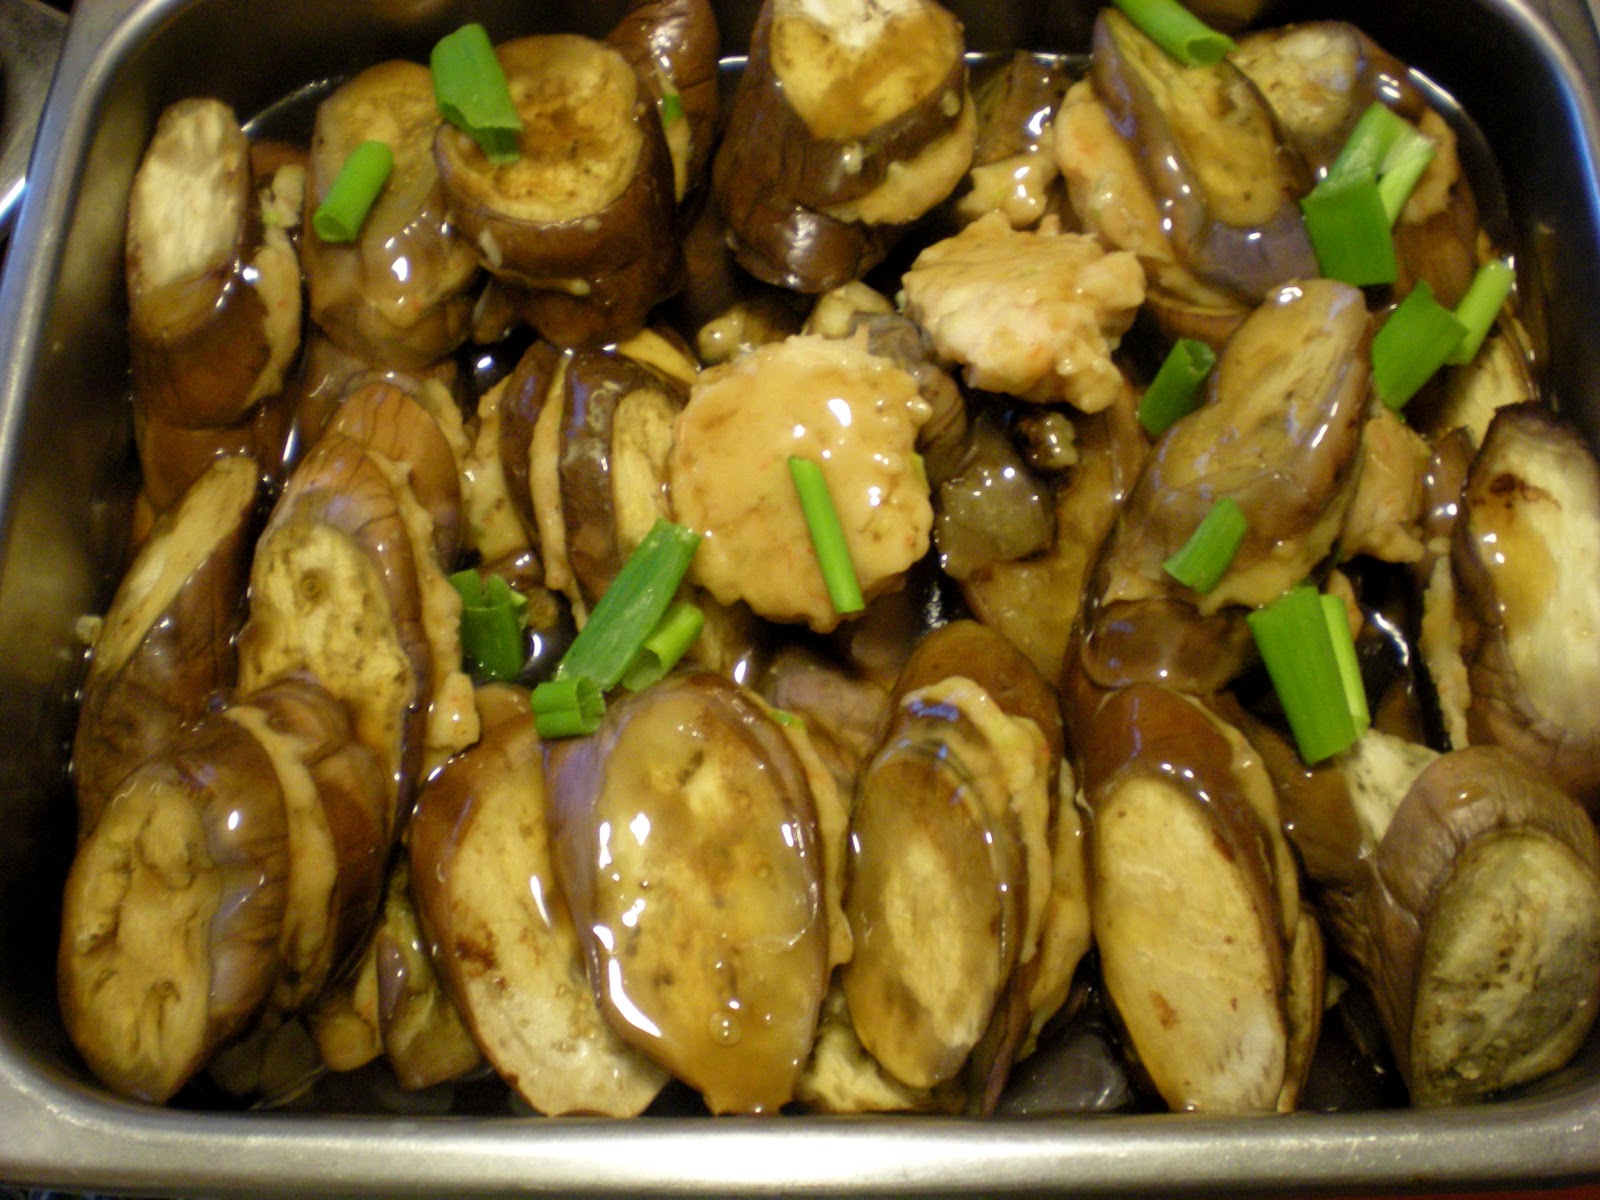
Stuffed Eggplants with Oyster Sauce

This is Japanese eggplants stuffed with grinded shrimp and fish. All is cooked in a rich oyster sauce.


Hong Kong Egg Tarts - Dan Tat

What is the best way to end this Chinese feast? Even with a hyper full stomach, there is always room for desserts. See my post on Hong Kong Egg Tarts - Dan Tat for details.


This is all folks! I hope you enjoyed reading this one in a lifetime 200th post!

Saturday, November 27, 2010

Oven-Dried Plum Tomatoes


What do blood cells, McGill University, Peru, pink and wines have in common? This is the theme of our recent cooking session. I'll start with my contribution of the evening. For appetizers, I wanted to make something on my Must-do list and one that came to mind was this simple and flavor-packed oven-roasted cherry tomatoes when I was at Aimee's summer potluck. Here is her post on Simple Bites. You can also find an alternative version of our local food blogger Elaine on A Series of Kitchen Experiments. 

Plum tomatoes were on sale and I read a scientific article (found here) that plum tomatoes take less time to dehydrate than "regular" tomatoes because of the moisture content. This requires less than 10 minutes of your time to prepare this appetizer, but a lot of time to dry the tomatoes about 6-8 hours or overnight. Here's a tip: if you don't feel comfortable of leaving your oven on for that long, make it at a friend's place whose his electricity is included in the rent. This is what I did. Serve these tomatoes with multigrain crackers and soft spreadable cheese such as Boursin Herbs and Garlic. I can guarantee you that your guests won't resist of eating more than one.

Preparation: 10 mins
Roasting Time: 6-8 hours

Ingredients

12 plum tomatoes, quartered
Olive oil
Salt and Pepper

Procedure

1. Preheat oven to 400F.

2. Place plum tomatoes in a bowl. Drizzle with olive oil and season with salt and pepper.

3. Line a baking sheet with aluminium foil or parchment paper. Arrange tomatoes skin side-down.

4. Set oven to your lowest heat setting. Bake for 6-8 hours until edges have shriveled and inside still moist but not juicy.


5. Serve with soft cheese and crackers.


Preserving oven-dried tomatoes

Transfer tomatoes in a clean and sterilized jar, pour olive oil to cover. You can add a crushed garlic and a few sprigs of fresh herb such as oregano and marjoram. Preserve up to 2 weeks in the fridge.

After a few days, give a nice roasted tomato flavor to your dishes (or salads) with the preserved tomato oil.


Wednesday, November 24, 2010

Vanilla Cream Pie with Caramelized Apple Topping

Does it occur to you that you have a surplus of egg whites (or egg yolks) and you have no idea what to do with it? Over a year ago, I tried to make a lemon custard which required a fair amount of egg yolks. I disastrously overcooked the egg yolks and end up with a curdled mess. I felt so bad of wasting them that I gave up making custard desserts, fearing that I will mess up again. I also didn't want to end up with a big batch of egg whites lying around my fridge.

Last week, my Taiwanese friend wanted to make a vanilla cream pie. Since I'm using his eggs, I don't feel bad if I mess the custard so I went for it.  It is very similar to the Lemon Meringue Pie, but the pastry cream is made first, refrigerated and then transfered onto the baked pie shell. Also, we used caramelized apples as our topping instead of the meringue. Unfortunately, I did not take any pictures of the pastry cream which ended up to be a great success. Oh well, there is always next time. The cream recipe is adapted from allrecipes.com.

Serves 8
Preparation Time: 45 mins
Cooking Time: 40 mins
Printable Recipe

Ingredients

1 pie dough

Vanilla Pastry Cream

2 cups whole milk
6 egg yolks
1 tsp vanilla extract
1/2 cup white sugar
4 tbsp all-purpose flour
4 tbsp unsalted butter
1 pinch salt

Caramelized Apple Topping

1 tbsp butter
5-6 Golden Delicious apples, peeled and diced
1/2 lemon, juiced
1/3 cup + 1/2 cup brown sugar

Procedure

1. In a saucepan, place milk, half of the sugar and vanilla extract over medium heat.

2. In a bowl, combine egg yolks and sugar, whisk until pale and thick. Mix in flour and salt.

3. When milk starts to boil, remove from heat. Slowly pour half of the hot milk into the yolk mix, stirring constantly.

4. Place all the yolk mixture into saucepan over medium heat.

5. Remove from heat and stir in butter. Strain for a smoother texture. Transfer to a bowl and cover with plastic wrap directly on the cream to prevent skin formation.

6. Preheat oven to 350F.

7. Butter a 9'' pie pan. Prepare pie dough. Roll out dough onto 9'' pie plate. Prick the bottom with a fork.

8. Bake for 15 mins until golden brown.

9. In a saucepan, melt butter over medium-low heat. Add apples and cook in lemon juice and 1/3 cup brown sugar

10. Remove baked pie dough from the oven. Spread with pastry cream and topped with cooked apples.

11. Sprinkle the remaining brown sugar under a broiler until sugar caramelizes. Serve hot.

Friday, November 19, 2010

Bite-Size Parmesan Chicken


I'm not from the South, but I love Southern cuisine. The ingredients are easy to find, the dishes are simple to make, and the food is all about comfy and homey. Last week, chicken breasts were on special and it has been a while that I haven't eaten any bread crumb coated chicken. I found on Simply Recipes a mouthwatering dish that I need to absolutely make it at my next cooking session and I did! The bite-size parmesan chicken was a great hit and some of us tempted to eat more than others (including me). Think of this dish as the fresh and tastier version of chicken nuggets.

Serves 6
Preparation Time: 15 mins
Cooknig Time: 15 mins
Printable Recipe

Ingredients

3 chicken breasts, cut into bite size
2 garlic cloves, minced
1/2 cup butter, melted
1/2 cup Parmesan, grated
3 tbsp parsley, chopped
1/4 tsp garlic powder
1 tsp Italian seasoning
Salt and Pepper

Procedure

1. Preheat oven to 450F. Pat chicken pieces dry and toss in 2 tsp of salt.


2. In a bowl, combine melted butter and garlic. In another bowl, mix together bread crumbs, Parmesan, parsley, garlic powder, Italian seasonings, salt and pepper.


3. Dip chicken in butter then into bread crumb mix to coat.

4. Place coated chicken pieces on 9''x13'' baking pan. Leave room between each piece. Drizzle with remaining butter.


5. Bake for 15 mins or until chicken runs clear. Serve.

Tuesday, November 16, 2010

No-Cream Creamy Broccoli Soup


Potatoes are a versatile ingredient to have in your pantry. Since it is considered as a starch (not a vegetable), you can use it as a thickener to give a creamy texture to the soup. This creamless broccoli soup can easily fool you and your guests for a cream of broccoli soup. This soup requires only three main ingredients, making it vegan, dairy-free and gluten-free. Tip: if the soup is too salty, add more steamed broccoli instead of water.

Serves 6
Preparation Time: 10 mins
Cooking time: 20 mins
Printable Recipe

Ingredients

1 large russet potato, peeled and cubed
3-4 broccolis, chopped
3 1/2 cups vegetable stock
Salt and Pepper to taste

Procedure

1. In a large pot, combine potatoes, broccolis and vegetable stock. Cover and bring it to a boil. Reduce heat to medium-low and simmer for 20 mins or until potatoes are soft.


2. Purée mixture with an immersion blender. Season with salt and pepper. Serve.

LinkWithin

Related Posts Plugin for WordPress, Blogger...