Today marks the third blog anniversary of Random Cuisine. The past weeks, I was trying to figure out if I should make a
tower cake or take on
an extreme food challenge. The first two years in the food blogging world, it sounds like an exciting idea but I feel that I should approach it differently and cover a hot topic in the food blogging community: food photography. I'm no expert in this field, but at least I can tell you what I have learn up until now. After all, photography is a learning curve same as any other hobbies. Looking back at my first ever post, I realized that I came so far with my photography skills. I wouldn't be able to do it, without the guidance and criticism of my photography friends. I wish they would create a website to showcase their outstanding work.
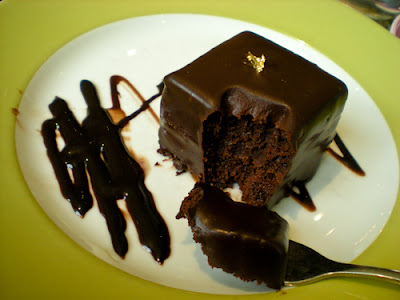 |
| Sacher Torte from Fortnum & Mason in London. |
Food photography is a very broad topic. I would have to write a book to cover all its aspects. This won't happen as I'm still inexperienced on some major aspects of photography such as styling and camera flashes. It is not about having fancy cameras that makes you a better photographer. It is how you handle it, and the skills that you have acquired since you held your first camera. I have been shooting with my point-and-shoot (Nikon Coolpix S210) for over 4 years, I'm very proud what I can do with this little camera. Despite its limitations, I managed to overcome them over the years.
Reading through thousands of blog posts, it seems on many bloggers mind that natural lights and DSLR cameras are the only solutions to capture stunning pictures. Unfortunately, I'm one of these people that these criteria cannot be met. First, I finish work very late at night, usually around 8pm so I do most of my cooking at night. This means that natural light is mostly unavailable. Don't expect me to leave my food overnight and take pictures the next morning. Second, I carry my camera all the time. When opportunities come, I shoot at food that I eat, powerpoint slides in seminars given by keynote speakers, and lab equipment. However, I can't imagine myself carrying all the time a heavy bulky camera, especially on vacations.
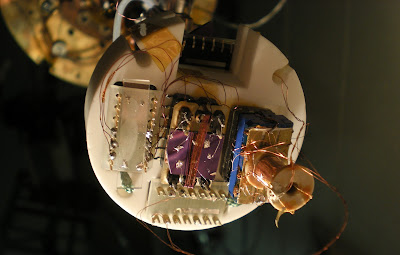 |
| A picture of my lab experiment. |
I bet many people are in the same shoes as me, so how do you mediate these issues? As a scientist, we always think that there is a solution to all problems. Since last year, I have been paying attention to the tiniest details in a food picture such as lighting, background, and composition.
Darren Rowse article provides a good summary of types of questions that I would ask myself when I see a food picture.
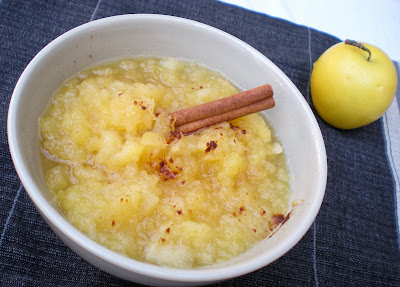 |
| Apple-Cinnamon Compote |
Playing with the manual settings of your camera such as shutter speed, white balance, exposure, macro mode, and manual focus improves the quality of your images tremendously. In my opinion, shutter speed is key to obtain a nice sharp pictures. For the unfamiliars, a shutter is a component in your camera which allows the light through for a fixed period of time to expose a light-sensitive sensor. Once the sensor captures enough light, the shutter closes and an image is displayed on the screen. More light means faster shutter speed. That is why, when one shoots in low light areas, the shutter speed is slow and most of the time you will get a blurry image if not using a tripod. For close-up shoots like food, macro mode is a must.
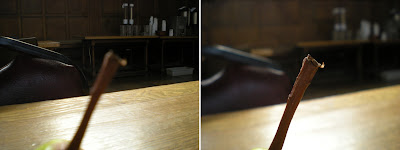 |
| Left image: normal mode. Right image : macro mode. |
The following sections will cover both of my under-the-budget daylight and night photography setup.
Daylight setup
The only opportunity that I can shoot in natural light is on weekends. With natural light, you can guaranteed that the object is well lit and acquire a fast shutter speed. Shooting in daylight can sometimes be tricky because of the bright harsh light. One trick is to wait until the clouds cover partially the Sun which help soften the light. Another trick is to use white curtains or any transparent white fabric to diffuse light.
A photography setup should not cost a fortune especially for an amateur photographer. My setup is quite simple: natural light, one coffee table, a background cloth (I mostly use black or white cloth), and a placemat. On the left is a poster board that I picked up from an art shop. This board acts as a reflector to minimize shadows.
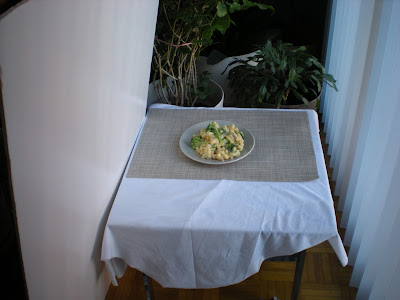 |
| Daylight photography setup |
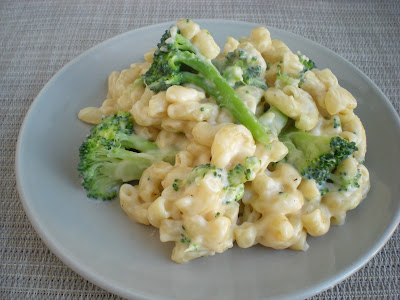 |
| Picture without any image processing. |
An image processing software such as Adobe Photoshop Lightroom is useful to brighten up some colours and make the picture sharper.
 |
| Picture with image processing. |
Night Photography Setup
Now that I showed you about my daylight setup, night food photography or even indoor photography is a bit tricky because of the limited amount of light. I did quite a lot of research about positioning light sources with respect to the subject for indoor shooting. The main goal is to acquire a fast shutter speed, this implies that the subject should be properly lit. I have learned a tremendous amount through trial and error as to what seems to work best and what doesn't.
 |
| Night photography setup |
My setup comprises of two lamps lighting both sides of the dish. To reduce harsh light from the lamps, I placed tissue papers fixed by an elastic band to reduce the intensity of light.
Make sure to have light bulbs that do not emit heat. Otherwise, your tissue papers might caught on fire. In addition, a bed lamp, sitting on top of the drawer, provides an overall lighting to reduce harsh shadows. Here is the finalized picture of this grilled piri piri flank steak topped with guacamole.
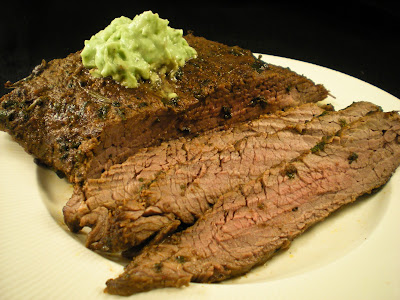 |
| Grilled piri piri flank steak after image processing. |
I hope you enjoyed reading this post. I'm still far from understanding everything about photography so I hope that this post gave you some insights on improving the quality of your pictures. I will end this post with this fun quote from Digital Photography School:
"Experiment! Photography should be fun and with practically zero cost to experiment digitally, play with your camera and see what works for you."


Thanks for sharing how you set up when taking picture during daytime and night. Actually i dont have any setting, my dining table and wooden table at patio area are two places i taking pictures..i'm glad that i have more chances to take picture during daytime under natural light...
ReplyDeleteGreat post on your 3rd blogiversary! I always afraid to take pictures during night time and I've learned something from you. Thank you & Happy Birthday Victor :)
ReplyDeleteFirst.. Happy blogiversary!!
ReplyDeleteSecond.. thanks for sharing your ideas on setting up for photos.. I wish I had better lighting... it might be time to invest in some actual lights! lol
Happy blogiversary, Victor! And excellent post, very informative!
ReplyDeleteHappy blogiversary!!
ReplyDeleteThis is a very informative and helpful blog post!
happy third anniversary to your blog great tips and yours pics are wonderful
ReplyDeleteCongrats on the 3rd anniversary!!! Wow... My 1st is coming up and it's been a wonderful journey. I can't imagine how it would be after 2 years! Thanks for sharing your work space. I don't get good light in kitchen or dining so I have fake table in living room. :-). Enjoyed your post!
ReplyDeleteCongratulations on anniversary. What an interesting post full I good hints. I need to get better with my photos.
ReplyDeleteRota
Congrats on your 3rd year! That's an achievement! And thanks for the great photo tips. I agree, natural light is so helpful for photography
ReplyDeleteAwesome topic you chose for this post, Happy Blogiversary!
ReplyDeleteHappy Third Anniversary to your blog and many thanks for the photography tips as well!
ReplyDeleteCongrats Victor, happy third anniversary to ur blog,excellent tips too.
ReplyDeleteHappy 3rd blog anniversary! you know, i never take pictures at night, just unable to, to do it with my point and shoot camera..yes, even when i tried adjusting the brightness, it always comes out blur..but now i got to check on the macro mode..i hope my camera has that..i'm still not very sure of all the functions that my camera has. Thanks so much for sharing this info!
ReplyDeleteregarding the mixture of bread flour and cake flour, it's just my trying out with the, The original recipe only calls for one type of flour. I've seen it in some taiwanese bread baking books that they do mix both flours , but just a very little amount of cake flour..not in buns but mostly in european breads..i think the end result could be less chewy. As in my bread, i didnt see significance difference maybe the cake flour used was just a very little amount, the loaf risen well and good texture but not as fluffy as in asian buns.
Happy 3rd bloggiversary! I totally agree on the food photography front - I have a big DSLR but its such a hassle to take around with me. I also don't have time to shoot in the days, and I photoshop the ones I take at night, I think it turns out well like yours too! I also think its great you've taught yourself this and not taken any fancy course, that way you develop your own skills and style! :)
ReplyDeleteAdd a copyright at the bottom
ReplyDeleteHappy 3rd Blogiversary to you! I must say that your blog is really fantastic and I have enjoy reading your posts and your cooking all these while. I'm curious to know if there is any difference in day and night photography and you have given a great insight of this difference.
ReplyDeleteI would also like to take this opportunity to wish you and your family a Merry Christmas and all the best for the year 2012! CHEERS!
Happy 3rd Blogiversary!
ReplyDeleteThanks for all the photography tips! I'm using a tiny camera and know almost nothing about photography! I seldom take photos at night!
Merry Christmas and Happy Holidays, Victor!
I think there is a design to be down on customary wedding photography, however the genuine working structure is as yet the same for most wedding picture takers.https://vladletophotography.com/
ReplyDeleteThese sorts of photographs must be imaginatively and pointedly taken. We can catch them anyplace like, in a studio, in a flat or anyplace outside. https://photolemur.com/blog/how-to-create-amazing-photos-using-light-shadow-reflection
ReplyDeleteNatural smiles and unique moments are captured with this style of Photography. Orange Lemur
ReplyDeleteInvestigate a greater amount of Nap Beltran amazing Internet Marketing Tips on Photography denver wedding photography
ReplyDelete