Showing posts with label Desserts. Show all posts

Saturday, March 16, 2013

Chocolate Sushi with Coconut Rice


I considered myself as an autodidact. I learn things through peers, reading articles and numerous trials and errors. School has the tendency to prevent self-development, prevent us to evolve as a person. It seems our success depends strongly on how well we perform in school. Ever since I started graduate school, I have the freedom to explore new horizons - areas that are unknown to me, things that I always wanted to learn that are outside of my field of expertise (nanotechnology).

Being creative in cooking is all about applying your past experiences to create something original. Inspirations come from my travels to the UK, Singapore, South Korea, Hong Kong and within Canada. Inspirations also come from learning through friends where we gather together for cooking. Finally, inspirations come from numerous successes and failures in the kitchen. These experiences are both instructive and a source of inspiration for others.

Mango and Coconut Rice Sushi. Photo Credit: Hossein Ghayoor
A while back, sushi was the cooking theme. More than 20 people participated in this event. This cooking party was different from our usual events. Instead of paying big bucks for a how-to-make-sushi course, people had to bring their own fillings and make their own sushi through the guidance of other more-or-less experienced sushi makers. The hosts made over 12 cups of sushi rice. You can't imagine how many sushi was made throughout the evening.

Photo Credit: Hossein Ghayoor
Here is my take on sushi: I see a piece of sushi which can be broken down into three fundamental parts - a dark pliable outer layer, white rice and some colourful fillings. As long I have all these three components, it can be considered as a sushi. My wildest attempt is to make a dessert sushi. I came up with a chocolate sushi filled with sweet coconut rice, figs, and strawberries. The chocolate 'seaweed' is the modelling chocolate, often used in wedding cakes for making designs. It's pliable and simple to make, requires only 2 ingredients. Modelling chocolate has a similar texture to play-d'oh. The coconut rice is an inspiration from my trip to Singapore where coconut milk and rice seems to be an inseparable duo. Finally, strawberries and figs marry well with the chocolate. Grab a bite of this chocolate sushi, it's simply irresistible, every flavour from each individual ingredient is distinguishable in this one bite - a one-bite wonder.

Photo Credit: Hossein Ghayoor
Chocolate Sushi with Coconut Rice
Makes about 30 chocolate sushi
Preparation Time: 30 mins
Cooking Time: 30 mins
Cooling Time: 2 hours + overnight
Printable Recipe

Ingredients

Modelling Chocolate
14 oz. chocolate pellets
5 oz. light or dark corn syrup

Coconut Rice
3/4 cup jasmine rice
1 can  (400mL) coconut milk
1/3 cup white sugar
1/2 tsp salt

Fillings
2 figs, thinly sliced
2 strawberries, thinly sliced

Procedure

1. In a double boiler, melt chocolate pellets over medium heat.


2. Add in corn syrup and stir until thick. The mixture should not coat your finger. 


3. Divide mixture into two, wrap it in a plastic bag. Cool at room temperature for 2 hours.


4. Meanwhile, prepare the coconut rice. Triple wash rice with cold water until the water becomes clear.

5. In a medium pot, combine rice, coconut milk, sugar and salt. Bring to a boil. Cover and simmer over medium heat for 30 mins until rice becomes tender and sticky. Remove from heat, cool to room temperature.

6. For the modelling chocolate, transfer onto wax paper. Roll it into a rectangle (about 13'' x 6'') - it should be at least 2mm thick to avoid breaking the dough.


7. Spread half of the coconut rice onto the chocolate modelling chocolate. Leaving about 1/2-inch both upper and lower end of the chocolate uncovered. Place slices of figs and strawberries on top, near the bottom edge of the coconut rice.


8. To roll, lift the wax paper near you and fold it over the fillings. As you roll and the wax paper reaches the surface of the chocolate, pull back the edge of the paper and continue to roll tightly until the roll id completed. Repeat steps 6 to 8 for the other modelling chocolate.


9. Cool both rolls in the fridge on a flat surface overnight to let the modelling chocolate set.


10. Cut chocolate sushi with a sharp knife.

Friday, January 11, 2013

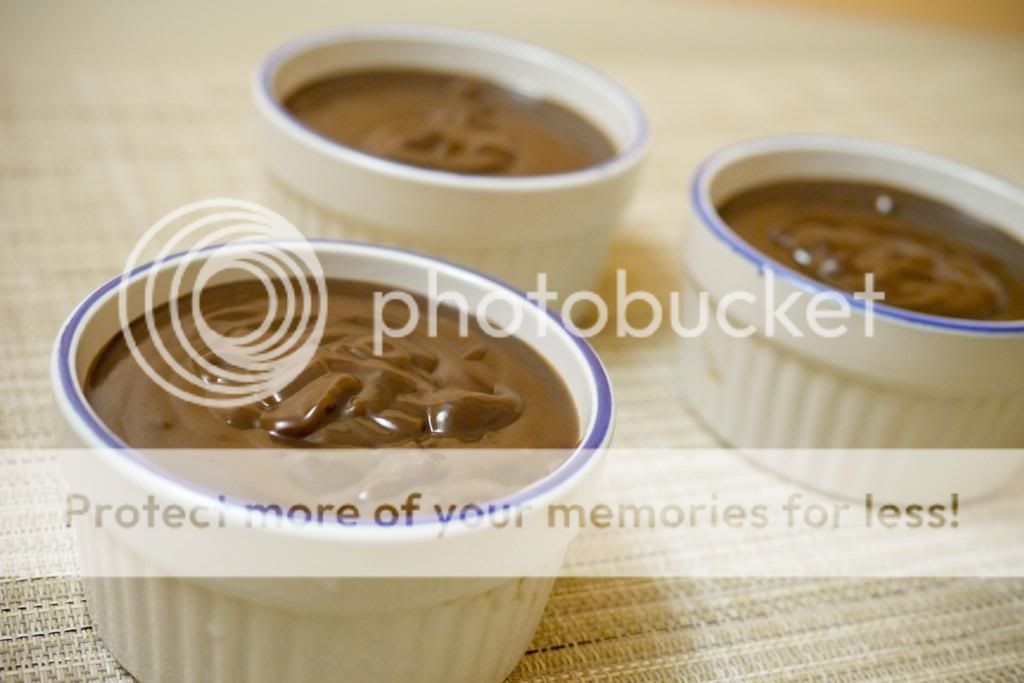
Homemade Chocolate Pudding


Have you ever wondered, when you go to a supermarket, if a product can be homemade? My parents used to buy lots of chocolate pudding when we were child and we tried like different brand of pudding. With time and with a more refined palate, I feel that the store-bought chocolate pudding has a weird after taste and  depending on the brand, some puddings do not taste like real chocolate... What's your take on chocolate pudding?

I made this recipe several times during the holidays with some variations. I experimented with high quality cocoa powder, real Cadbury chocolate pellets, cheaper quality chocolate. It is interesting how each pudding taste different from one to another. I guess this is why it is enjoyable to make desserts homemade.


Question: Do you know how to make chocolate sweeter? Our first educative guess is to add more sugar. Well... in fact, this is wrong. You just need to add a pinch of salt. Try it yourself, take two pieces of chocolate, sprinkle one with sugar and the other with salt. See which is sweeter. When you add salt in any food, it enhances the flavour. It can make sweet things sweeter and cut down bitterness like eggplants. 

These chocolate pudding are indulgent, and easy to make. It requires only pantry ingredients. How could you say 'no' to chocolate?

Fills 6 ramekins
Preparation Time: 5 mins
Cooking Time: 15 mins
Can be served cold or warm

Ingredients
With cocoa powder
1/2 cup brown sugar
3 tbsps cocoa powder
3 tbsps cornstarch
1/4 tsp salt
2 3/4 cups milk

OR

With chocolate pellets
1/4 cup brown sugar
3 tbsps cornstarch
1/4 tsp salt
3 cups milk
about 6 oz. dark chocolate

Procedure

Recipe with cocoa powder
1. In a double boiler, sift cocoa powder and cornstarch. Mix it with brown sugar. Add in milk while whisking until all dissolved. Boil and then bring to a simmer for 15 mins until the pudding thickens. Stir occasionally. Transfer pudding to ramekin.

Recipe with chocolate pellets
1. In a double boiler, sift cornstarch. Mix it with brown sugar.


2. Add in milk while whisking until all dissolved. Boil and then bring to a simmer. Add in chocolate pellets.


3. Simmer for 15 mins until thickens. Stir occasionally.


4. Transfer pudding to ramekins.


5. If serve cold, place a plastic film directly on the pudding to prevent from forming skin. If you like pudding skin, just cover it without contact.

Thursday, October 11, 2012

Dark Chocolate Cake with Chocolate Buttercream - The Science behind a Moist Cake


Not blogging for months does not mean that I lost my passion for food. Oh no! Not in a million of years. In fact, I have been a bit more active on my second blog, Montreal Food Pictures, launched at the beginning of this year. Since a lot of restaurant food pictures are piling up on my laptop, I might as well showcase those too. Here is a glance of pictures of my new website.


As a scientist, I enjoy analysing, I enjoy breaking down problems into smaller pieces, understanding each part individually and solving them. I also do the same for recipes. Have you ever ask yourself why a recipe uses these ingredients, or are all these ingredients necessarily for this recipe? How about... why do you have to mix these ingredients in this order? What happened if you mix up the order? I do ask myself these questions, and sometimes I can tell if the recipe will turn out to be a disaster by simply reading it... Maybe because of my cooking experience and my knowledge in food science that I know...or simply instincts...

A few months back, I wanted to produce the moistest cake ever for my good friend Jorge. I have bake several cakes in the past for my friends' birthday although I always desired a moister cake. Now, I'm quite confident that this is THE moistest cake that I have ever made. How? Let me go through with you the secrets behind this chocolate cake recipe. Once you grasp them, you can apply these little tips to any other cake recipes. Don't be afraid to tweak any cake recipe, even mine!

It is all about knowing your ingredients, what is the central role for each ingredient? Also, it is important to know your basics. Have a look at the list of ingredients for this chocolate cake recipe below, three components are key to make a cake moist:

1. Fats like butter, yoghurt and oil are considered as tenderizers. They coat the proteins of the flour to prevent them from binding with water to form gluten. Developing a gluten network leads to a bread-like texture. A weak gluten network is the trick to make the cake soft.

2. Cake flour is a key ingredient, it has less proteins than all-purpose flour, and less gluten forms when mixing with the batter. You can make your own cake flour by mixing 7 parts all-purpose flour with 1 part cornstarch.

3. Cream of tartar and baking soda is a killer combination. Baking soda requires an acid for its activation. Any acid such as cream of tartar, buttermilk, vinegar, chocolate, honey, and/or molasses would do the job. The reaction forms bubbles of carbon dioxide in the batter making the cake lighter and puffier.

Make sense? The next time that you make a cake, consider applying all these tips. Let me know how it turns out.

Makes 2 11-inch cake
Preparation Time: 20 mins
Baking Time: 25 mins

Ingredients

Génoise
2 cups boiling water
1 cup cocoa powder
2 3/4 cups cake flour
2 tsps baking soda
1/2 tsp cream of tartar
1/2 tsp salt
1 cup butter, softened
2 1/4 cups white sugar
4 eggs
2 tsp vanilla extract

Chocolate Buttercream Icing
1/2 cup butter, softened
2/3 cup cocoa powder
1 3/4 cup icing sugar
1/3 cup milk

Procedure

1. Preheat oven to 350F.

2. Grease 2 11-inch round cake pans.

3. In a medium bowl, whisk cocoa powder with boiling water until smooth. Let mixture cool.


4. Sift together flour, baking soda, cream of tartar, and salt. Set aside.

5. In a large bowl, cream butter and sugar together until light and fluffy (like a whipping cream texture). Beat in one egg at a time, then add in vanilla.


6. Incorporate flour mix with cocoa mixture alternatively into the butter mix.


7. Spread batter evenly between two pans. Bake for 25 mins.


8. Meanwhile, prepare the Chocolate Buttercream Icing. Using an electric mixer, beat butter and cocoa butter until creamy. Whisk in milk and icing sugar alternatively until it reaches a frosting consistency.


9. Remove cake from oven. Cool completely before releasing the cake. Frost génoise with chocolate buttercream.


Sunday, February 5, 2012

Lemon Bars with Sweet Pie Crust


The art of making pie crusts seem to be a tedious job among many home cooks. One would rather buy the frozen one instead of making it from scratch to save up time. I recalled the moment that I opened my first cookbook, the first thing that I wanted to do is to make pie crusts from scratch. Still a newbie in baking, I basically winged the recipe hopefully it turns out okay. At that time, I didn't know why butter must be very cold, why use less than 1 tablespoon of cold water to assemble the dough, why the dough must not be overworked. Unfortunately, I didn't follow properly the recipe, and the crust was hard as rock. After a few more attempts, I decided to give myself a break and get back to it when I have more confidence in my baking skills.

With time, I found out about other types of pastry crusts which does not require such meticulous care likepâte sablée and sweet pastry crust (pâte sucrée). These crust can be made all in one bowl with an electrical mixer. The end result is a sweet, buttery and tender crust, ready to be used for any creamy and fruity pies.


What gotten me in baking desserts as well as the launch of this blog is the success of my first ever baked dessert - lemon bars. The combination of the tartness and tanginess of the lemons and the buttery pastry crust makes it so irresistible. This recipe is much simpler than the one previously published and also has less fat. To get the most flavours out of the lemon, consider adding lemon zest, a tip that I learned when I competed in Recipe to Riches with my Blueberry-Lemon Crisp recipe.

Makes about 12-16 bars
Crust recipe adapted from Joy of Baking
Preparation Time: 30 mins
Refrigeration Time: 30 mins
Baking Time: 35 mins
Chilling Time: 1 hour
Printable Recipe

Ingredients

Sweet Pastry Crust
3/4 cup butter, softened
1/3 cup white sugar
1 egg, beaten
2 cups flour, sifted
1 pinch salt

Filling
5 eggs
5 lemons, juiced with 2 tsp of zest
1 cup white sugar
1/2 cup plain yoghurt or sour cream

Icing sugar

Procedure

1. In a large bowl, beat butter until creamy. Add in sugar and beat until light and fluffy.


2. Gradually incorporate beaten egg while whisking. Add in the flour and salt, beat until it forms a dough-like texture.

3. Flatten dough and wrap it in plastic and refrigerate for 30 mins until firm.


4. Preheat oven to 400F.

5. Transfer dough to lightly butter and flour 13'' x 9'' baking pan. Press dough onto bottom and up the sides of the baking pan, about 1/4-inch up. Prick bottom dough with a fork.


6. Bake for 5 mins. Reduce oven temperature to 350F for 15 mins until golden brown. Remove from oven, let it cool.


7. Meanwhile, prepare filling. In a medium bowl, beat eggs, lemon juice, zest, sugar and yoghurt.


8. Pour filling to the baked dough.

9. Bake for 15 mins until firm. Do not overbake as the filling may crack. Cool completely and refrigerate until well chilled.


10. Sprinkle with icing sugar and cut into bar sizes. Serve.


Wednesday, January 18, 2012

Nutella Chestnut Brownies - A 3-Ingredient Recipe


A while back, I wrote my experience about Deepavali. After publising that post, I have been told that some members of the Malaysian and Singaporean Student's Association are addicted to brownies and printed all my brownie recipes. I was trying to recall when was the last time I published my last brownie recipe. In fact, there are only two brownie recipes on this blog: Macadia Nut Brownies and Butterscotch-glazed Brownies. Both were published in 2009.

I was figuring out if brownies can be made with a minimal number of ingredients in case I received a last minute dinner party invitation or days that I just don't feel like baking, and cleaning the dishes afterwards. Making these Nutella brownies require only 5 mins of your time and three ingredients only. Well, four ingredients if you add some crunch to your brownies like walnuts or chestnuts. All you need is one bowl, one parchment paper, and a baking pan.  


These brownies are dense, chewy and chocolatey. Whip up a batch of these brownies in no time for your next party dinner. You won't be disappointed.

Update 04/01/2013: The recipe was retested several times to optimize the final result. To ensure the brownie to be moist, add in one egg at a time and incorporate flour with a rubber spatula. 

Makes 12 brownies
Preparation Time: 5 mins
Baking Time: 12-15 mins

Ingredients

1 cup Nutella
2 eggs
3/4 cup flour, sifted
1/2 cup roasted chestnuts, coarsely chopped (optional)

Procedure

1. Preheat oven to 350F. Align parchment paper on lightly oil 8''x8'' baking pan. 

2. In a mixing bowl, whisk Nutella and add in one egg at a time until smooth.


3. With a rubber spatual, slowly incorporate flour. Mix in chestnuts.


4. Transfer mixture to prepared baking pan. Bake for 12-15 mins until it passes the toothpick test.


5. Let it cool. Cut into squares. Serve.

Wednesday, November 30, 2011

Maple Pouding Chômeur - Poor Man's Pudding


Everyone has an ingredient that they couldn't live without, so what is your favourite that you must absolutely use? Maple syrup is my favourite ingredient of all time, this natural and versatile ingredient can be used both in desserts and savory dishes. Not only it is good for drizzling on pancakes, it also gives a hint of sweetness in glazes or sauces for seafood, poultry, and meat. 

The traditional pouding chômeur is an irresistible sweet and comfy dessert for French Canadian. The Poor man's pudding was popular since the Great Depression of Quebec and remains a favourite dessert in the homes of Quebecers to this day. Made of basic baking ingredients, one can define this dessert as a syrupy pudding with a cake on top. Usually served warm, a cold glass of milk will make a good companion.

Serves 12
Preparation Time: 15 mins
Baking Time: 30 mins
Printable Recipe

Ingredients

Sauce
1 cup maple syrup
1 cup brown sugar
1 1/2 cup water

Batter
1/2 cup butter or margarine, softened
2/3 cup white sugar
2 eggs
1/2 tsp vanilla
1 1/2 cup all-purpose flour
1 tbsp baking powder
1/2 cup milk

Procedure

1. Preheat oven to 350F.

2. In a saucepan, mix maple syrup, brown sugar, and water. Bring to a boil. Simmer for 5 mins until slightly reduced. Transfer sauce to a 8-inch square baking pan.


3. With an electric mixer, beat butter and sugar until creamy.


4. Add in eggs and vanilla, beat until uniform.


5. In another bowl, sift flour and baking powder.

6. Incorporate dry ingredients to butter mixture, alternate with milk.


7. Transfer batter to baking pan, spreading uniformly over the sauce.


8. Bake for 30 mins until golden or until it passes the toothpick test.


9. Serve warm.


Remarks

You can prepare this a day in advance, reheat the pudding for 10-15 mins at 250F.

LinkWithin

Related Posts Plugin for WordPress, Blogger...